Why Migrate?
Key Takeaways for Migrating Your WordPress Site to a New Host
Migrating your WordPress site to a new host requires careful preparation and step-by-step execution to ensure a smooth transition without downtime or data loss.
- Understand why you might want to migrate: better performance, enhanced security, and cost-effectiveness are common reasons.
- Prepare by securing admin access, SFTP/SSH credentials, and database access for both current and new hosts before starting the migration.
- Choose a new host based on uptime guarantees (99.9%+), reliable 24/7 customer support, and necessary features like SSL and caching.
- Always backup your entire WordPress site including files and database before migrating, using SFTP/SSH, WP-CLI, phpMyAdmin, or backup plugins.
- Manual migration involves SFTP/SSH file transfers, database export/import, and updating configuration files; follow detailed guides to avoid errors.
- Test your site thoroughly on the new host before going live, checking links, media, and functionality to ensure everything works properly.
Preparation Steps
Before you start, make sure you have:- Admin Access: You’ll need this for both your current and new host.
- FTP Credentials: For file transfers.
- Database Access: Usually via something like phpMyAdmin.
Choosing a New Host
When it comes to choosing a new host, you’ll want to consider several factors:- Uptime: Look for a host that offers at least 99.9% uptime. This ensures your site is accessible most of the time.
- Customer Support: 24/7 customer support is ideal. You never know when you’ll run into issues.
- Features: Make sure the host offers the features you need, such as SSL certificates, multiple databases, or specific types of caching.
Backup Your Site
Before you even think about migrating, you absolutely must backup your entire site. This includes:- Files: Backup all your WordPress files. This includes your themes, plugins, and uploads.
- Database: Use tools like phpMyAdmin to export a copy of your WordPress database.
Migrating the Site
Manual Migration
For those who like to have complete control over every aspect of their website, manual migration is the way to go. This method involves a bit more hands-on work, but it gives you the flexibility to customize the migration process to fit your specific needs. You’ll be dealing with FTP transfers, database exports, and configuration file edits, but don’t worry-we’ll guide you through each step to ensure a smooth transition. Read on to learn how to manually migrate your WordPress site to a new host.Transfer Files: Use FTP to Transfer Your Files
- Connect to Old Host: Use an FTP client like FileZilla to connect to your old hosting account.
- Download Files: Navigate to the root directory of your WordPress installation. Download the following essential files and folders to your local computer:
- wp-content folder: Contains your themes, plugins, and media files.
- wp-config.php: Your WordPress configuration file.
- .htaccess: Configures your server settings.
- wp-includes and wp-admin: Contains core WordPress files.
Import Database: Using phpMyAdmin
- Export Old Database: Log in to phpMyAdmin on your old host, select your WordPress database, and export it as a
.sqlfile. - Create New Database: On your new host, create a new database via cPanel or equivalent.
- Import to New Database: Log in to phpMyAdmin on your new host, select your new database, and import the
.sqlfile you exported earlier.
Update wp-config.php: Update the Database Details
- Locate wp-config.php: This file is in the root directory of your WordPress installation.
- Edit Database Details: Open
wp-config.phpand update the following:- Database Name: Update
DB_NAMEto match the new database. - Database User: Update
DB_USERto match the new database user. - Database Password: Update
DB_PASSWORDto match the new database password. - Database Host: Update
DB_HOSTif it’s different on your new host. - Site URL: If your domain is changing, update
WP_HOMEandWP_SITEURL.
- Database Name: Update
Additional Steps
- Disable Caching Plugins: Before starting the migration, disable any caching plugins as they can interfere with the process.
- Update DNS Settings: Don’t forget to update your DNS settings to point to the new host after you’ve confirmed that everything is working as expected.
- Permalinks: It’s a good practice to go to your WordPress settings and resave your permalink structure. This will refresh all the links on your site, ensuring they work correctly after the migration.
Migration Using Plugins
If the thought of manually migrating your WordPress site makes you break out in a cold sweat, don’t worry-there’s an easier way. Using migration plugins can simplify the process, making it almost as easy as clicking a few buttons. This method is perfect for those who may not be comfortable dealing with databases and FTP transfers. In this section, we’ll explore how to use plugins to migrate your WordPress site seamlessly.Premium Plugins
- Duplicator Pro: Known for its simple step-by-step wizard.
- UpdraftPlus Premium: Offers a migration tool in its premium version.
- Formerly BackupBuddy, Solid Backups: A premium-only solution that lets you make a complete copy of your site.
- WP Migrate DB: Specifically designed for database migration.
Free Plugins
- All-in-One WP Migration: A popular free option that covers most migration needs.
- WP Clone: Another free plugin that allows you to clone your WordPress site.
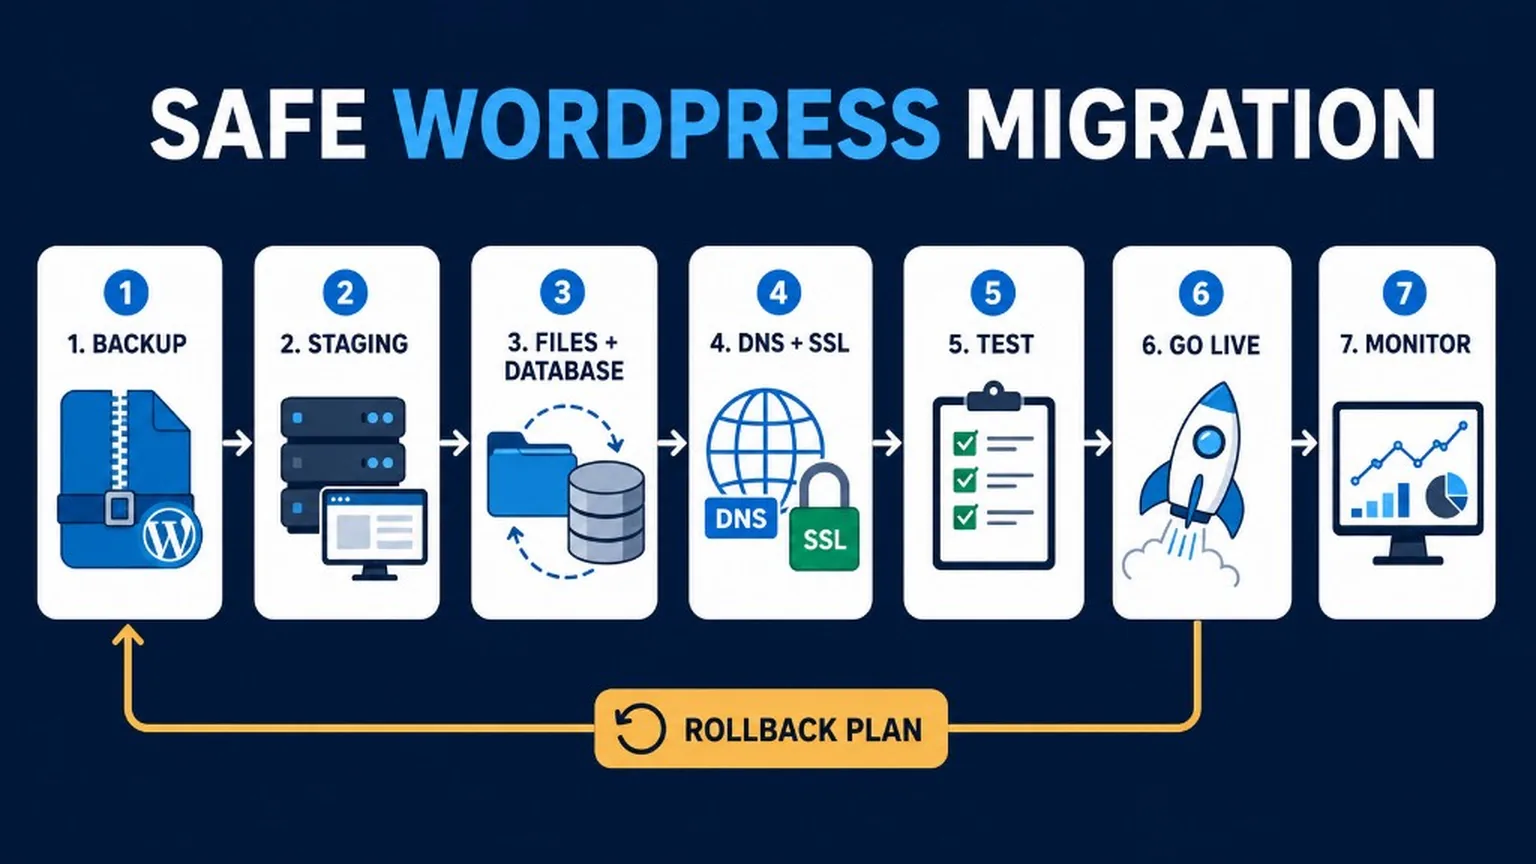
Migration runbook (beyond copy-paste)
Lower DNS TTL early, freeze content, move with SFTP/SSH or WP-CLI, then verify more than the homepage.
- Lower DNS TTL 24-48h before cutover so the switch propagates faster.
- Staging / snapshot on the destination host; confirm PHP and MySQL/MariaDB versions match your plan.
- Maintenance / freeze – pause content edits and WooCommerce orders if you cannot accept divergence.
- Transfer – prefer SFTP or SSH (not plain FTP). Use WP-CLI for DB export/import and a serialized-safe search-replace of URLs.
- SSL, mail, cron – issue certificates, re-check SMTP/SPF, point real cron at the new host.
- Cache / Redis / queues – flush caches; reconfigure object cache and WooCommerce action schedulers on the new stack.
- Rollback plan – keep old host resolvable until post-checks pass; know how to revert DNS.
Host selection: hosting recommendation. Recovery point: backups. Aftercare: maintenance.
Testing
Before going live, test your site to ensure everything works as expected. Look for: Broken Links: Make sure all internal and external links work. Media: Check if all images and videos load correctly. Functionality: Test all forms, buttons, and other interactive elements.Post-migration checks
Do not call it done when the homepage loads – verify forms, pay, APIs, media, SEO, mail, and logs.
- Forms and transactional email deliverability
- Login / wp-admin and user roles
- Payments and webhooks (WooCommerce)
- REST API / headless consumers
- Media URLs and uploads path
- Redirects, canonical tags, XML sitemap
- 404 crawl – see 404 error guide
- Server and application error logs
Going Live
Once you’re satisfied with the testing, it’s time to go live. This usually involves: Removing Temporary URLs: Replace any temporary URLs with your actual domain name. Final Backup: Make one last backup, just in case. DNS Propagation: Wait for DNS changes to propagate across the web.Consider Hiring a Professional
If all of this sounds a bit overwhelming, or if you simply don’t have the time to manage the migration yourself, it might be a good idea to hire a professional. Freelancers and agencies specializing in WordPress can handle the migration for you, ensuring that nothing goes awry during the process. One such service is wpdude-headless.local/, which offers comprehensive WordPress migration services among other specialized WordPress solutions. By hiring experts, you can focus on what you do best and leave the technical details to those who deal with them every day.Implementation Checklist for Migrating Your WordPress Site to a New Host
Follow these essential steps to ensure a smooth and secure migration of your WordPress site to a new hosting provider.
- Choose a reliable new hosting provider that meets your site’s performance and support needs.
- Create a full backup of your WordPress files and database using plugins like
UpdraftPlusor manual methods viaphpMyAdminand FTP. - Export your WordPress database and download all site files from the current host.
- Upload your WordPress files to the new host using
FTP/SFTPand import the database viaphpMyAdminor hosting control panel. - Update the
wp-config.phpfile with the new database credentials and check for any hardcoded URLs that need changing. - Test the migrated site on the new host using a temporary URL or hosts file modification to verify functionality and fix any issues.
- Update your domain’s DNS settings to point to the new host’s servers and monitor propagation until the site is live.
Related on WP-Dude
For a smooth transition and enhanced management of your WordPress site, consider exploring these related guides that complement the migration process.
- Backing up and Restoring Your WordPress Site
- Hosting recommendation
- How to fix 404 errors
- WordPress maintenance
- Securing Your WordPress Site with a Firewall
Frequently Asked Questions (FAQ)
FAQ is for readers – Google FAQ rich results were retired in May 2026.
Here are practical Q&A pairs addressing common concerns about migrating a WordPress site to a new host, based on actual search queries and user intent.
How do I manually move my WordPress site to a new host?
To manually move your WordPress site, first back up your entire site files and database. Then upload the files to the new host via SFTP/SSH and import the database using phpMyAdmin. Finally, update the wp-config.php file with the new database details and adjust your domain’s DNS settings to point to the new host.
What are the essential preparation steps before migrating a WordPress site?
Before migrating, ensure you have a full backup of your site files and database. Check your new host’s compatibility with WordPress, prepare login credentials, and temporarily disable caching or security plugins to avoid conflicts during migration.
How can I backup my WordPress site before moving to a new host?
Use a reliable backup plugin or manually download your WordPress files via SFTP/SSH and export your database through phpMyAdmin. Store backups securely offline or in cloud storage to prevent data loss during migration.
What should I do after migrating my WordPress site to ensure everything works?
After migration, test your site thoroughly by checking all pages, links, and functionality. Clear your browser and server caches, verify that permalinks work correctly, and ensure emails and forms are functioning as expected before going live.
Is it necessary to hire a professional for migrating a WordPress site?
While manual migration is possible, hiring a professional can save time and reduce risks of downtime or data loss, especially for complex sites. Professionals also handle DNS changes and troubleshooting, ensuring a smooth transition.
How do I update DNS settings after moving my WordPress site to a new host?
Log into your domain registrar’s control panel and update the nameservers to those provided by your new host. DNS propagation can take up to 48 hours, so keep your old hosting active during this period to avoid downtime.